Détection d'Objets
TensorFlow / TFlite
AIoT: Computer Vision Tuto 03
Introduction
Classification, Détection et Segmentation
Nous avons vu dans le tutoriel 02 le code source en python/pytorch d'un réseau de neurones qui illutre le principe d'apprentissage automatique profond ou Deep Learning de classification d'images. Nous allons voir dans ce tuto l'utilisation de TensorFlow (et TFlite) pour un autre aspect de traitement d'images: la détetcion d'un objet et de son emplacement dans une image (Object detection).
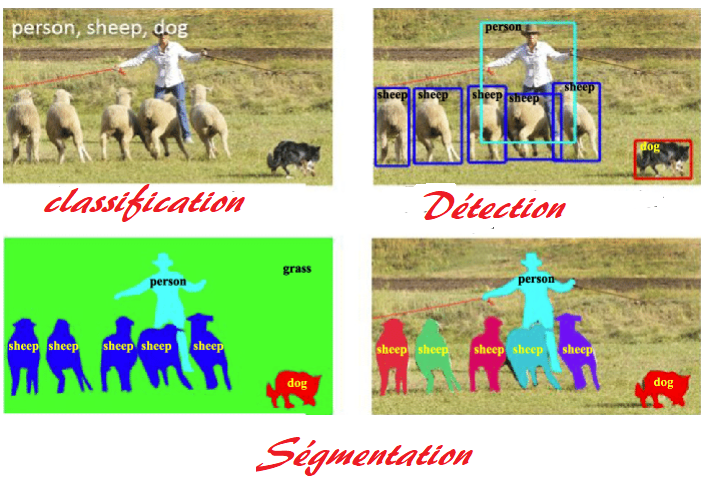
L'image de gauche illustre la différence entre la classification (l'image appartient à une classe: par exemple c'est l'image d'un chat ou celle d'un chien comme vu dans le tuto précédent), la détection (Il y a un chien aux coordonnées (x,y,xx,yy) -objet de ce tuto- de l'image) et la segmentation où chaque pixel de l'image est affecté à une classe
Nous allons utiliser un model pré entrainé de détection d'objets qui sera adapté et entrainé sur un dataset personalisé afin de détecter de nouvels objets
Construction du DataSet
Pour entrainer notre model nous aurons besoin de beaucoup de données d'entrainement, à savoir des images annotées (c-a-d des images avec les coordonnées et les libellées des objets cibles qui y sont présents). Il y a des tuto off avec des dataset disponibles sur TensoFlow qui permettent d'entrainer des models de détection d'objets. Dans ce tuto nous allons construire notre propre dataset personalisé.
Comment faire?:
- Télécharger (idéalement avec du web scraping) les images cibles (une centaine min par objet)
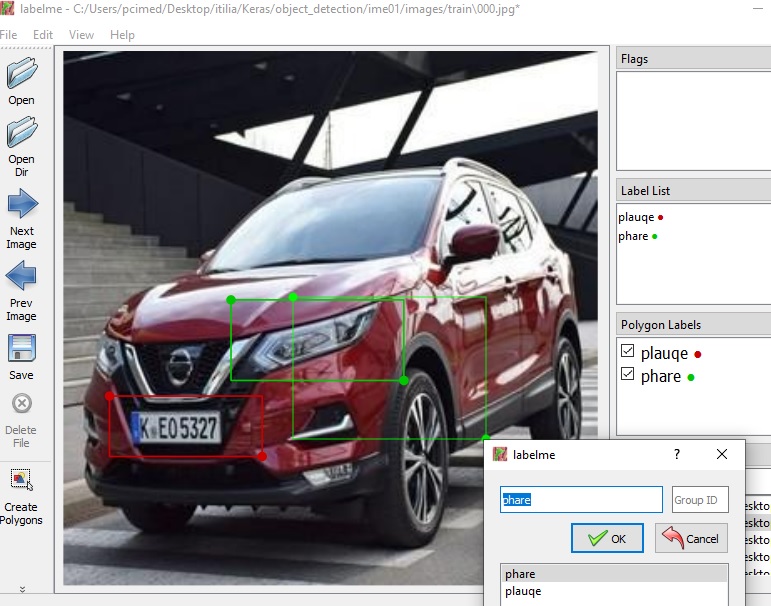
- Avec des outils d'annotation disponibles sur le web notez l'emplacement des objets cibles sur les images
- Générer les fichiers .xml correspendants
- Préparer le DataSet (idéalement au format tfrecord même si ce n'est pas une obligation)
Nous allons prendre comme cibles dans ce tuto les objets suivants : plaques d'immatriculation, cible (au choix), visage et main.
Jupyter/Notebook
Pourquoi utiliser notebook
Jupyter est un outil open source python qui permet d'excuter le code par lot depuis un navivagateur, permettant ainsi de mieux déboguer et corriger le code.
Pour l'installer il suffit de :
- 1. pip3 install jupyter
- 2. cd WorkDir
- 3. jupyter notebook
Collecte des images par web scraping
Le Web Scraping est une technique d'extraction automatique du contenu de sites Web, par script ou programme, tout comme jupyter notebook ce tutiriel ne fait que mentionner l'outil ou la technique avec un exemple simple d'utlisation, sachant que vous pouvez très bien excuter le code d'entrainement qui suivra avec des images téléchargées manuellement et depuis un interpréteur python standrad ou de type Pycharm.
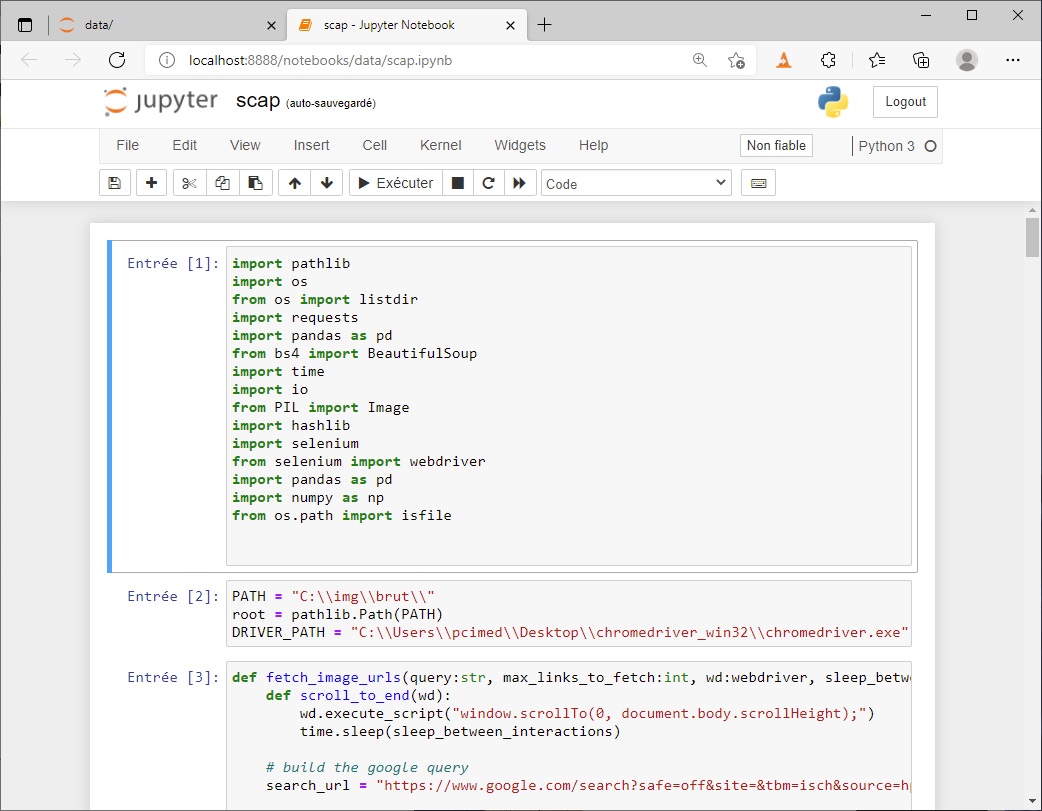
Ci-dessous un exemple de code. A noter qu'il vous faut télécharger le plugin chrome compatbile avec votre système d'exploitation.
import pathlib
import os
from os import listdir
import requests
import pandas as pd
from bs4 import BeautifulSoup
import time
import io
from PIL import Image
import hashlib
import selenium
from selenium import webdriver
import pandas as pd
import numpy as np
from os.path import isfile
Emplacment cible des images et du plugin chrome à modifier en fonction de votre installation
PATH = "C:\\img\\"
root = pathlib.Path(PATH)
DRIVER_PATH = "C:\\chromedriver_win32\\chromedriver.exe"
fonctions de recherche, de téléchargement
def fetch_image_urls(query:str, max_links_to_fetch:int, wd:webdriver, sleep_between_interactions:int=1):
    def scroll_to_end(wd):
        wd.execute_script("window.scrollTo(0, document.body.scrollHeight);")
        time.sleep(sleep_between_interactions)

    # build the google query
    search_url = "https://www.google.com/search?safe=off&site=&tbm=isch&source=hp&q={q}&oq={q}&gs_l=img"

    # load the page
    wd.get(search_url.format(q=query))

    image_urls = set()
    image_count = 0
    results_start = 0
    while image_count < max_links_to_fetch:
        scroll_to_end(wd)

        # get all image thumbnail results
        thumbnail_results = wd.find_elements_by_css_selector("img.Q4LuWd")
        number_results = len(thumbnail_results)

        print(f"Found: {number_results} search results. Extracting links from {results_start}:{number_results}")

        for img in thumbnail_results[results_start:number_results]:
            # try to click every thumbnail such that we can get the real image behind it
            try:
                img.click()
                time.sleep(sleep_between_interactions)
            except Exception:
                continue

            # extract image urls
            actual_images = wd.find_elements_by_css_selector('img.n3VNCb')
            for actual_image in actual_images:
                if actual_image.get_attribute('src') and 'http' in actual_image.get_attribute('src'):
                    image_urls.add(actual_image.get_attribute('src'))

            image_count = len(image_urls)

            if len(image_urls) >= max_links_to_fetch:
                print(f"Found: {len(image_urls)} image links, done!")
                break
        else:
            print("Found:", len(image_urls), "image links, looking for more ...")
            time.sleep(30)
            return
            load_more_button = wd.find_element_by_css_selector(".mye4qd")
            if load_more_button:
                wd.execute_script("document.querySelector('.mye4qd').click();")

        # move the result startpoint further down
        results_start = len(thumbnail_results)

    return image_urls

def persist_image(folder_path:str,url:str):
    try:
        image_content = requests.get(url).content

    except Exception as e:
        print(f"ERROR - Could not download {url} - {e}")

    try:
        image_file = io.BytesIO(image_content)
        image = Image.open(image_file).convert('RGB')
        file_path = os.path.join(folder_path,hashlib.sha1(image_content).hexdigest()[:10] + '.jpg')
        with open(file_path, 'wb') as f:
            image.save(f, "JPEG", quality=85)
        print(f"SUCCESS - saved {url} - as {file_path}")
    except Exception as e:
        print(f"ERROR - Could not save {url} - {e}")


def search_and_download(search_term:str,driver_path:str,target_path='./images',number_images=5):
    target_folder = os.path.join(target_path,'_'.join(search_term.lower().split(' ')))

    if not os.path.exists(target_folder):
        os.makedirs(target_folder)

    with webdriver.Chrome(executable_path=driver_path) as wd:
        res = fetch_image_urls(search_term, number_images, wd=wd, sleep_between_interactions=0.5)

    for elem in res:
        persist_image(target_folder,elem)
Pour Excuter le code (par exemple chercher 40 images de voiture) dans une nouvelle cellule
search_term='voiture'
search_and_download(search_term=search_term,driver_path=DRIVER_PATH,target_path=PATH,number_images=40)
Une fois vos images télechargées, annotées et les fichiers xml créés, vous pouvez passez à la préparation du dataset qui sera utilisé dans l'apprentissage.
Détection d'Objets à l'aide de l'apprentissage par transfert dans TensorFlow
Apprentissage par Transfert
Nous avons vu dans le tuto 02 un exemple de transfert de classification des images dans PyTorch. Nous allons suivre presque la même méthodologie.
Nous utilisons l'apprentissage par transfert pour utiliser les fonctionnalités d'image de bas niveau comme les bords, les textures, etc. Celles-ci sont apprises par un modèle pré-entraîné, cette fois-ci ça sera le SSD MobileNet V2 320x320 puis formons notre detecteur pour apprendre les détails de niveau supérieur dans nos cibles dans les images de jeu de données comme les plaques d'immatriculation, les visages, etc. ssd_mobilenet_v2_fpnlite_320x320_coco17_tpu-8 a déjà été formé sur COCO (Common Obejcts In COntext) avec des millions d'images et une centaines de cibles (labels).
Préparation des données
L'outil de labelisation (par exemple labelimg) génére un fichier xml par image au format Pascal VO, avec les informations sur l'image (le nom, la résolution , les coordonnées, le label ou la classe de chaque cible ...). Il faut générer un fichier csv unique à partir des .xml qui sera utilisé comme source de génération des fichiers tfrecord.
Il est à noter que les tfrcord (format tensorflow de sérialisation des données d'entrainement pour accèlérer l'apprentissage par lecture depuis le disque) reste une option pour ce tuto. D'ailleurs dans le premier exemple on peut tout à fait charger nos données directement depuis le répertoire images et les fichiers xml. Dans le second exemple spécifique à tflite le fichier csv lui même est le dataset D'ailleurs dans le premier exemple on peut tout à fait charger nos données directement depuis le répertoire images et les fichiers xml. Dans le second exemple spécifique à tflite le fichier csv lui même est le dataset
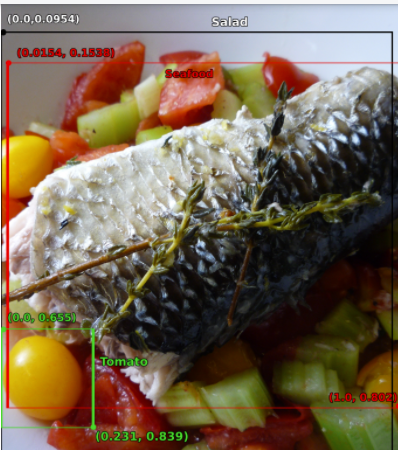
Le format cible du fichier csv (dans le cas d'un dataset à utiliser par object_detector.DataLoader.from_csv() est le suivant (extrait du tuto google qui sera adapté ici)
'''
TRAINING,gs://cloud-ml-data/img/openimage/3/2520/3916261642_0a504acd60_o.jpg,Salad,0.0,0.0954,,,0.977,0.957,,
VALIDATION,gs://cloud-ml-data/img/openimage/3/2520/3916261642_0a504acd60_o.jpg,Seafood,0.0154,0.1538,,,1.0,0.802,,
TEST,gs://cloud-ml-data/img/openimage/3/2520/3916261642_0a504acd60_o.jpg,Tomato,0.0,0.655,,,0.231,0.839,,#Prepare the dataset
'''
import pandas as pd
import numpy as np

def  get_filenames_of_path(dirName):
    # create a list of file and sub directories
    # names in the given directory
    listOfFile = os.listdir(dirName)
    allFiles = list()
    # Iterate over all the entries
    for entry in listOfFile:
        # Create full path
        fullPath = os.path.join(dirName, entry)
        # If entry is a directory then get the list of files in this directory
        if os.path.isdir(fullPath):
            allFiles = allFiles + getListOfFiles(fullPath)
        else:
            allFiles.append(fullPath)

    return allFiles

#génération du fichier csv source pour tfrecord
#
#
#

#xml_to_csv.py
import os
import glob
import pandas as pd
import xml.etree.ElementTree as ET


def xml_to_csv(path):
    xml_list = []
    for xml_file in glob.glob(path + '/*.xml'):
        tree = ET.parse(xml_file)
        root = tree.getroot()
        for member in root.findall('object'):
            value = (root.find('filename').text,
                     int(root.find('size')[0].text),
                     int(root.find('size')[1].text),
                     member[0].text,
                     int(member[4][0].text),
                     int(member[4][1].text),
                     int(member[4][2].text),
                     int(member[4][3].text)
                     )
            xml_list.append(value)
    column_name = ['filename', 'width', 'height', 'class', 'xmin', 'ymin', 'xmax', 'ymax']
    xml_df = pd.DataFrame(xml_list, columns=column_name)
    return xml_df


def main():
    #image_path = os.path.join(os.getcwd(), 'annotations')
    xml_df = xml_to_csv('./images/train')
    xml_df.to_csv('train_labels.csv', index=None)
    print('Successfully converted xml to csv.')


#Transformation en datset pour object_detector.DataLoader.from_csv
##number_plates/licensed_car_66.jpeg,300,157,378,189,plaque
#to
#TRAINING,image/001.jpg,plaque,0.0,0.0954,,,0.977,0.957,,


CSV_FILE_DEST="ime_dataset_train.csv"
CSV_FILE_SOURCE="images/train/train_labels.csv"

src = pd.read_csv(CSV_FILE_SOURCE)
with codecs.open(CSV_FILE_DEST, 'w', 'utf-8')as f:
    for _, row in src.iterrows():
        res1="TRAINING,imgages/train/"+row['filename']+","+row['class']+","+str(round(float(row['xmin'])/float(row['width']),4))+","+str(round(float(row['ymin'])/float(row['height']),4))
        res2=",,,"+str(round(float(row['xmax'])/float(row['width']),4))+","+str(round(float(row['ymax'])/float(row['height']),4))+",,"
        print(res1+res2)
        f.write(res1+res2)
        f.write('\n')
f.close()
#generate_tfrecord.py
"""
Usage:
  # From tensorflow/models/
  # Create train data:
  python generate_tfrecord.py --csv_input=data/train_labels.csv  --output_path=train.record
  # Create test data:
  python generate_tfrecord.py --csv_input=data/test_labels.csv  --output_path=test.record
"""
from __future__ import division
from __future__ import print_function
from __future__ import absolute_import

import os
import io
import pandas as pd
import tensorflow as tf

from PIL import Image
from object_detection.utils import dataset_util
from collections import namedtuple, OrderedDict

flags = tf.app.flags
flags.DEFINE_string('csv_input', '', 'Path to the CSV input')
flags.DEFINE_string('output_path', '', 'Path to output TFRecord')
flags.DEFINE_string('image_dir', '', 'Path to images')
FLAGS = flags.FLAGS


# TO-DO replace this with label map
def class_text_to_int(row_label):
    if row_label == 'plaque':
        return 1
    elif row_label == 'cible':
        return 2
    elif row_label == 'visage':
        return 3
    elif row_label == 'main':
        return 4
    else:
        None


def split(df, group):
    data = namedtuple('data', ['filename', 'object'])
    gb = df.groupby(group)
    return [data(filename, gb.get_group(x)) for filename, x in zip(gb.groups.keys(), gb.groups)]


def create_tf_example(group, path):
    with tf.gfile.GFile(os.path.join(path, '{}'.format(group.filename)), 'rb') as fid:
        encoded_jpg = fid.read()
    encoded_jpg_io = io.BytesIO(encoded_jpg)
    image = Image.open(encoded_jpg_io)
    width, height = image.size

    filename = group.filename.encode('utf8')
    image_format = b'jpg'
    xmins = []
    xmaxs = []
    ymins = []
    ymaxs = []
    classes_text = []
    classes = []

    for index, row in group.object.iterrows():
        xmins.append(row['xmin'] / width)
        xmaxs.append(row['xmax'] / width)
        ymins.append(row['ymin'] / height)
        ymaxs.append(row['ymax'] / height)
        classes_text.append(row['class'].encode('utf8'))
        classes.append(class_text_to_int(row['class']))

    tf_example = tf.train.Example(features=tf.train.Features(feature={
        'image/height': dataset_util.int64_feature(height),
        'image/width': dataset_util.int64_feature(width),
        'image/filename': dataset_util.bytes_feature(filename),
        'image/source_id': dataset_util.bytes_feature(filename),
        'image/encoded': dataset_util.bytes_feature(encoded_jpg),
        'image/format': dataset_util.bytes_feature(image_format),
        'image/object/bbox/xmin': dataset_util.float_list_feature(xmins),
        'image/object/bbox/xmax': dataset_util.float_list_feature(xmaxs),
        'image/object/bbox/ymin': dataset_util.float_list_feature(ymins),
        'image/object/bbox/ymax': dataset_util.float_list_feature(ymaxs),
        'image/object/class/text': dataset_util.bytes_list_feature(classes_text),
        'image/object/class/label': dataset_util.int64_list_feature(classes),
    }))
    return tf_example


def main(_):
    writer = tf.python_io.TFRecordWriter(FLAGS.output_path)
    path = os.path.join(FLAGS.image_dir)
    examples = pd.read_csv(FLAGS.csv_input)
    grouped = split(examples, 'filename')
    for group in grouped:
        tf_example = create_tf_example(group, path)
        writer.write(tf_example.SerializeToString())

    writer.close()
    output_path = os.path.join(os.getcwd(), FLAGS.output_path)
    print('Successfully created the TFRecords: {}'.format(output_path))


if __name__ == '__main__':
    tf.app.run()
Ci dessous le code d'entrainement en mode eager (actif). A noter qu'il est possible d'utiliser le script TensorFlow model_main_tf2.py (disponible dans object_detection après l'installation de l'API en local, voir tuto google). Dans ce tutoriel j'ai modifié l'exemple officiel pour l'apater à un nombre de classes supérieur à 1 (4 dans cet exemple) et des données d'entrainement stockées dans des tfrecors
#ime le 25/07/2021:   mixe tfrecord  avec eager_few_shot_od_training_tflite
#https://github.com/tensorflow/models/blob/master/research/object_detection/g3doc/tf2.md
#https://github.com/tensorflow/models/blob/master/research/object_detection/g3doc/tf2_detection_zoo.md
#git clone https://github.com/tensorflow/models.git


# !!!!!!!!!!!!!  tflite_convert --saved_model_dir=tflite/saved_model --output_file=ime.tflite après saved_model
# Pour un test tflite

# ici Training - Fine-tune a pre-trained detector in eager mode on custom data
'''
import os
import pathlib

# Clone the tensorflow models repository if it doesn't already exist
if "models" in pathlib.Path.cwd().parts:
  while "models" in pathlib.Path.cwd().parts:
    os.chdir('..')
elif not pathlib.Path('models').exists():
  !git clone --depth 1 https://github.com/tensorflow/models

# Install the Object Detection API
%%bash
cd models/research/
protoc object_detection/protos/*.proto --python_out=.
cp object_detection/packages/tf2/setup.py .
python -m pip install .

'''

import matplotlib
import matplotlib.pyplot as plt

import os
import random
import io
import imageio
import glob
import scipy.misc
import numpy as np
from six import BytesIO
from PIL import Image, ImageDraw, ImageFont
from IPython.display import display, Javascript
from IPython.display import Image as IPyImage

import tensorflow as tf

from object_detection.utils import label_map_util
from object_detection.utils import config_util
from object_detection.utils import visualization_utils as viz_utils
#from object_detection.utils import colab_utils
from object_detection.builders import model_builder

from PIL import Image
from numpy import asarray
from datetime import datetime

import IPython.display as display

import cv2

%matplotlib inline
def load_image_into_numpy_array(path):
  """Load an image from file into a numpy array.

  Puts image into numpy array to feed into tensorflow graph.
  Note that by convention we put it into a numpy array with shape
  (height, width, channels), where channels=3 for RGB.

  Args:
    path: a file path.

  Returns:
    uint8 numpy array with shape (img_height, img_width, 3)

  img_data = tf.io.gfile.GFile(path, 'rb').read()
  image = Image.open(BytesIO(img_data))
  (im_width, im_height) = image.size
  return np.array(image.getdata()).reshape(
      (im_height, im_width, 3)).astype(np.uint8)
  """
  image = Image.open(path)
  # convert image to numpy array
  data = asarray(image)
  return data

def plot_detections(image_np,
                    boxes,
                    classes,
                    scores,
                    category_index,
                    figsize=(12, 16),
                    image_name=None,
                     ts=0.3):
  """Wrapper function to visualize detections.

  Args:
    image_np: uint8 numpy array with shape (img_height, img_width, 3)
    boxes: a numpy array of shape [N, 4]
    classes: a numpy array of shape [N]. Note that class indices are 1-based,
      and match the keys in the label map.
    scores: a numpy array of shape [N] or None.  If scores=None, then
      this function assumes that the boxes to be plotted are groundtruth
      boxes and plot all boxes as black with no classes or scores.
    category_index: a dict containing category dictionaries (each holding
      category index `id` and category name `name`) keyed by category indices.
    figsize: size for the figure.
    image_name: a name for the image file.
  """
  image_np_with_annotations = image_np.copy()
  viz_utils.visualize_boxes_and_labels_on_image_array(
      image_np_with_annotations,
      boxes,
      classes,
      scores,
      category_index,
      use_normalized_coordinates=True,
      min_score_thresh=ts)
  if image_name:
    plt.imsave(image_name, image_np_with_annotations)
  else:
    plt.imshow(image_np_with_annotations)
# Create a dictionary describing the features.
image_feature_description = {
'image/height': tf.io.FixedLenFeature([], tf.int64, default_value=0),
'image/width': tf.io.FixedLenFeature([], tf.int64, default_value=0),
'image/filename': tf.io.FixedLenFeature([], tf.string) ,
'image/source_id': tf.io.FixedLenFeature([], tf.string),
'image/encoded': tf.io.FixedLenFeature([], default_value='', dtype=tf.string,),
'image/format': tf.io.FixedLenFeature([], default_value='jpeg', dtype=tf.string),
'image/object/bbox/xmin': tf.io.VarLenFeature(tf.float32),
'image/object/bbox/xmax': tf.io.VarLenFeature(tf.float32),
'image/object/bbox/ymin': tf.io.VarLenFeature(tf.float32),
'image/object/bbox/ymax': tf.io.VarLenFeature(tf.float32),
'image/object/class/label': tf.io.VarLenFeature(tf.int64),
}
def _parse_image_function(example_proto):
# Parse the input tf.train.Example proto using the dictionary above.
return tf.io.parse_single_example(example_proto, image_feature_description)
# Load images and visualize modified ime from train record
'''
img_data = tf.io.gfile.GFile(path, 'rb').read()
image = Image.open(BytesIO(img_data))
(im_width, im_height) = image.size
return np.array(image.getdata()).reshape(
(im_height, im_width, 3)).astype(np.uint8)
'''
ds = tf.data.TFRecordDataset('train.record').map(_parse_image_function)
train_images_np = []
i=0
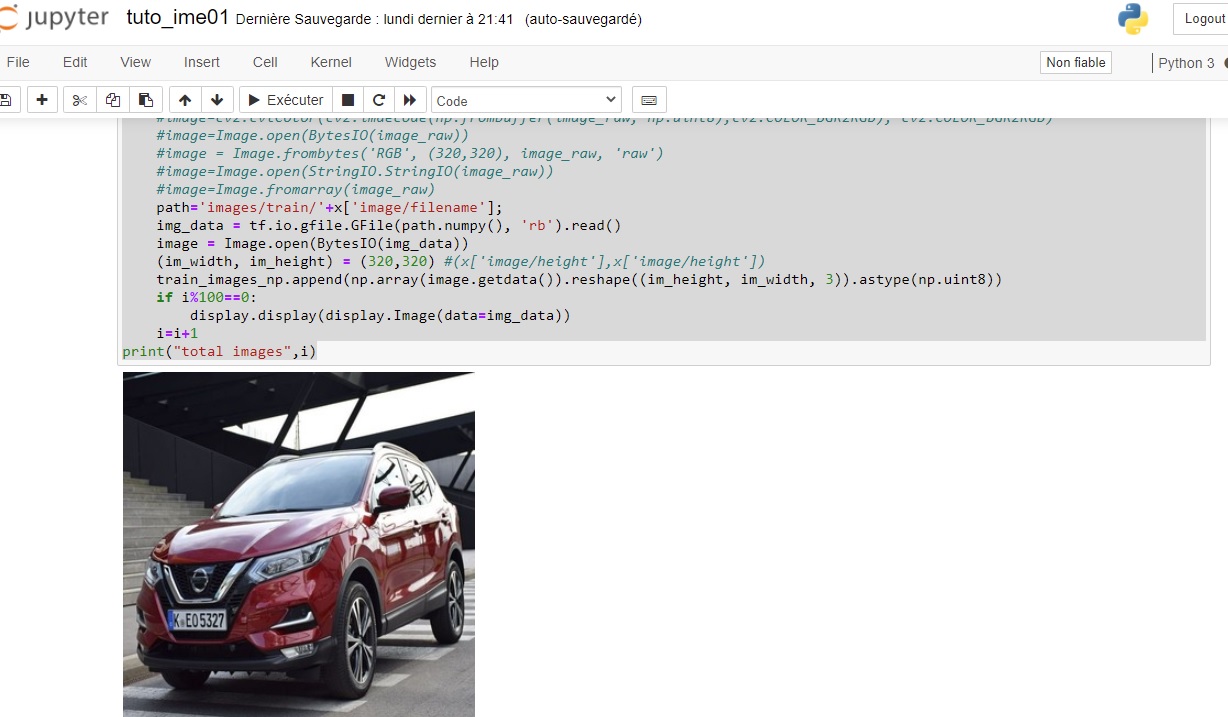
for x in ds:
#image_raw = x['image/encoded'].numpy()
#image=cv2.cvtColor(cv2.imdecode(np.frombuffer(image_raw, np.uint8),cv2.COLOR_BGR2RGB), cv2.COLOR_BGR2RGB)
#image=Image.open(BytesIO(image_raw))
#image = Image.frombytes('RGB', (320,320), image_raw, 'raw')
#image=Image.open(StringIO.StringIO(image_raw))
#image=Image.fromarray(image_raw)
path='images/train/'+x['image/filename'];
img_data = tf.io.gfile.GFile(path.numpy(), 'rb').read()
image = Image.open(BytesIO(img_data))
(im_width, im_height) = (320,320) #(x['image/height'],x['image/height'])
train_images_np.append(np.array(image.getdata()).reshape((im_height, im_width, 3)).astype(np.uint8))
if i%100==0:
display.display(display.Image(data=img_data))
i=i+1
print("total images",i)
Il faut aussi charger les cibles (featers: classe et coordonnées de chaque cible pour chaque image)
gt_boxes = []
gt_classes = []
i=0
for x in ds:
    box = np.array([[ x['image/object/bbox/ymin'].values[0],x['image/object/bbox/xmin'].values[0],
                     x['image/object/bbox/ymax'].values[0], x['image/object/bbox/xmax'].values[0] ]],dtype=np.float32)
    cl=np.array([x['image/object/class/label'].values[0]],dtype=np.int64)
    gt_boxes.append(box)
    gt_classes.append(cl)
    if i%50==0:
        print(box)
        print(cl)
    i=i+1
print("total images",i)
# Load the label map
with open('label_map.txt', 'r') as f:
    labels = [line.strip() for line in f.readlines()]
labels
category_index = {1: {'id': 1, 'name': 'plaque'},
                  2: {'id': 2, 'name': 'cible'},
                  3: {'id': 3, 'name': 'visage'},
                  4: {'id': 4, 'name': 'main'}
                 }
#Prepare data fror training
# By convention, our non-background classes start counting at 1.  Given
# that we will be predicting just one class, we will therefore assign it a
# `class id` of 1.

num_classes = 4

#category_index = {duck_class_id: {'id': duck_class_id, 'name': 'rubber_ducky'}}

# Convert class labels to one-hot; convert everything to tensors.
# The `label_id_offset` here shifts all classes by a certain number of indices;
# we do this here so that the model receives one-hot labels where non-background
# classes start counting at the zeroth index.  This is ordinarily just handled
# automatically in our training binaries, but we need to reproduce it here.

label_id_offset = 1
train_image_tensors = [] #1
gt_box_tensors = [] #2
gt_classes_one_hot_tensors = [] #3

for (train_image_np, gt_box_np,gt_class_np) in zip( train_images_np, gt_boxes,gt_classes):
  train_image_tensors.append(tf.expand_dims(tf.convert_to_tensor(train_image_np, dtype=tf.float32), axis=0))
  gt_box_tensors.append(tf.convert_to_tensor(gt_box_np, dtype=tf.float32))
  zero_indexed_groundtruth_classes = tf.convert_to_tensor( np.array(gt_class_np) - 1 ) #!todo- label_id_offset)
  gt_classes_one_hot_tensors.append(tf.one_hot(zero_indexed_groundtruth_classes, num_classes))

print('Done prepping data.')
#Let's just visualize some images  as a sanity check
dummy_scores = np.array([1.0], dtype=np.float32)  # give boxes a score of 100%

plt.figure(figsize=(30, 15))
for idx in range(5):
  plt.subplot(2, 3, idx+1)
  plot_detections(
      train_images_np[idx+100],
      gt_boxes[idx+100],
      gt_classes[idx+100],
      dummy_scores, category_index)
plt.show()

Tout est prêt. On va charger le model pré entainé, le modifier, l'entrainer sur notre dataset puis le sauvegarder pour enfin l'exporter en mode tflite.
Chargement du model.
tf.keras.backend.clear_session()

print('Building model and restoring weights for fine-tuning...', flush=True)
num_classes = 4
#pipeline_config = '../../object_detection/configs/tf2/ssd_mobilenet_v2_fpnlite_320x320_coco17_tpu-8.config'
#checkpoint_path = '../../object_detection/test_data/checkpoint/ckpt-0'
pipeline_config = '../../pre-trained-models/ssd_mobilenet_v2_fpnlite_320x320_coco17_tpu-8/pipeline.config'
checkpoint_path = '../../pre-trained-models/ssd_mobilenet_v2_fpnlite_320x320_coco17_tpu-8/checkpoint/ckpt-0'
# This will be where we save checkpoint & config for TFLite conversion later.
output_directory = 'output/'
output_checkpoint_dir = os.path.join(output_directory, 'checkpoint')

# Load pipeline config and build a detection model.
#
# Since we are working off of a COCO architecture which predicts 90
# class slots by default, we override the `num_classes` field here to be just
# one (for our new rubber ducky class).
configs = config_util.get_configs_from_pipeline_file(pipeline_config)
model_config = configs['model']
model_config.ssd.num_classes = num_classes
model_config.ssd.freeze_batchnorm = True
detection_model = model_builder.build(
      model_config=model_config, is_training=True)


# Save new pipeline config
pipeline_proto = config_util.create_pipeline_proto_from_configs(configs)
config_util.save_pipeline_config(pipeline_proto, output_directory)

# Set up object-based checkpoint restore --- SSD has two prediction
# `heads` --- one for classification, the other for box regression.  We will
# restore the box regression head but initialize the classification head
# from scratch (we show the omission below by commenting out the line that
# we would add if we wanted to restore both heads)
fake_box_predictor = tf.compat.v2.train.Checkpoint(
    _base_tower_layers_for_heads=detection_model._box_predictor._base_tower_layers_for_heads,
    #_prediction_heads=detection_model._box_predictor._prediction_heads,
    #    (i.e., the classification head that we *will not* restore)
    _box_prediction_head=detection_model._box_predictor._box_prediction_head,
    )
fake_model = tf.compat.v2.train.Checkpoint(
          _feature_extractor=detection_model._feature_extractor,
          _box_predictor=fake_box_predictor)
ckpt = tf.compat.v2.train.Checkpoint(model=fake_model)
ckpt.restore(checkpoint_path).expect_partial()

# To save checkpoint for TFLite conversion.
exported_ckpt = tf.compat.v2.train.Checkpoint(model=detection_model)
ckpt_manager = tf.train.CheckpointManager(
    exported_ckpt, output_checkpoint_dir, max_to_keep=1)

# Run model through a dummy image so that variables are created
image, shapes = detection_model.preprocess(tf.zeros([1, 320, 320, 3]))
prediction_dict = detection_model.predict(image, shapes)
_ = detection_model.postprocess(prediction_dict, shapes)
print('Weights restored!')
tf.keras.backend.set_learning_phase(True)

# These parameters can be tuned; since our training set has 5 images
# it doesn't make sense to have a much larger batch size, though we could
# fit more examples in memory if we wanted to.
batch_size = 2
learning_rate = 0.015
num_batches = 5000

# Select variables in top layers to fine-tune.
trainable_variables = detection_model.trainable_variables
to_fine_tune = []
prefixes_to_train = [
  'WeightSharedConvolutionalBoxPredictor/WeightSharedConvolutionalBoxHead',
  'WeightSharedConvolutionalBoxPredictor/WeightSharedConvolutionalClassHead']
for var in trainable_variables:
  if any([var.name.startswith(prefix) for prefix in prefixes_to_train]):
    to_fine_tune.append(var)

# Set up forward + backward pass for a single train step.
def get_model_train_step_function(model, optimizer, vars_to_fine_tune):
  """Get a tf.function for training step."""

  # Use tf.function for a bit of speed.
  # Comment out the tf.function decorator if you want the inside of the
  # function to run eagerly.
  @tf.function
  def train_step_fn(image_tensors,
                    groundtruth_boxes_list,
                    groundtruth_classes_list):
    """A single training iteration.

    Args:
      image_tensors: A list of [1, height, width, 3] Tensor of type tf.float32.
        Note that the height and width can vary across images, as they are
        reshaped within this function to be 320x320.
      groundtruth_boxes_list: A list of Tensors of shape [N_i, 4] with type
        tf.float32 representing groundtruth boxes for each image in the batch.
      groundtruth_classes_list: A list of Tensors of shape [N_i, num_classes]
        with type tf.float32 representing groundtruth boxes for each image in
        the batch.

    Returns:
      A scalar tensor representing the total loss for the input batch.
    """
    shapes = tf.constant(batch_size * [[320, 320, 3]], dtype=tf.int32)
    model.provide_groundtruth(
        groundtruth_boxes_list=groundtruth_boxes_list,
        groundtruth_classes_list=groundtruth_classes_list)
    with tf.GradientTape() as tape:
      preprocessed_images = tf.concat(
          [detection_model.preprocess(image_tensor)[0]
           for image_tensor in image_tensors], axis=0)
      prediction_dict = model.predict(preprocessed_images, shapes)
      losses_dict = model.loss(prediction_dict, shapes)
      total_loss = losses_dict['Loss/localization_loss'] + losses_dict['Loss/classification_loss']
      gradients = tape.gradient(total_loss, vars_to_fine_tune)
      optimizer.apply_gradients(zip(gradients, vars_to_fine_tune))
    return total_loss

  return train_step_fn

optimizer = tf.keras.optimizers.SGD(learning_rate=learning_rate, momentum=0.8) #Adam(learning_rate=learning_rate) #, momentum=0.9)


train_step_fn = get_model_train_step_function(
    detection_model, optimizer, to_fine_tune)

print('Start fine-tuning!', flush=True)
best_loss=0.12442388
bestid=0
for idx in range(num_batches):
  # Grab keys for a random subset of examples
  all_keys = list(range(len(train_images_np)))
  random.shuffle(all_keys)
  example_keys = all_keys[:batch_size]

  # Note that we do not do data augmentation in this demo.  If you want a
  # a fun exercise, we recommend experimenting with random horizontal flipping
  # and random cropping :)
  gt_boxes_list = [gt_box_tensors[key] for key in example_keys]
  gt_classes_list = [gt_classes_one_hot_tensors[key] for key in example_keys]
  image_tensors = [train_image_tensors[key] for key in example_keys]

  # Training step (forward pass + backwards pass)
  total_loss = train_step_fn(image_tensors, gt_boxes_list, gt_classes_list)

  if idx % 100 == 0:
    print('batch ' + str(idx) + ' of ' + str(num_batches)
    + ', loss=' +  str(total_loss.numpy()), flush=True)
    if total_loss < best_loss:
        best_loss=total_loss
        bestid=idx
        print("saving best loss",bestid)
        ckpt_manager.save()


print('Done fine-tuning!')

#ckpt_manager.save()
print('Best Checkpoint saved!',bestid," loss=",best_loss)
Nous avons sauvagdré au cours de l'entrainement le check point avec la perte la plus importante. Pour utiliser notre model en inférence tensorflow :
#Export & run with TensorFlow Lite
'''
Model Conversion
First, we invoke the export_tflite_graph_tf2.py script to generate a TFLite-friendly intermediate SavedModel. This will then be passed to the TensorFlow Lite Converter for generating the final model.
'''

!python export_tflite_graph_tf2.py  --pipeline_config_path=output\pipeline.config  --trained_checkpoint_dir=output\checkpoint  --output_directory=tflite
!tflite_convert --saved_model_dir=tflite/saved_model --output_file=tflite/imetuto.tflite
Et voilà
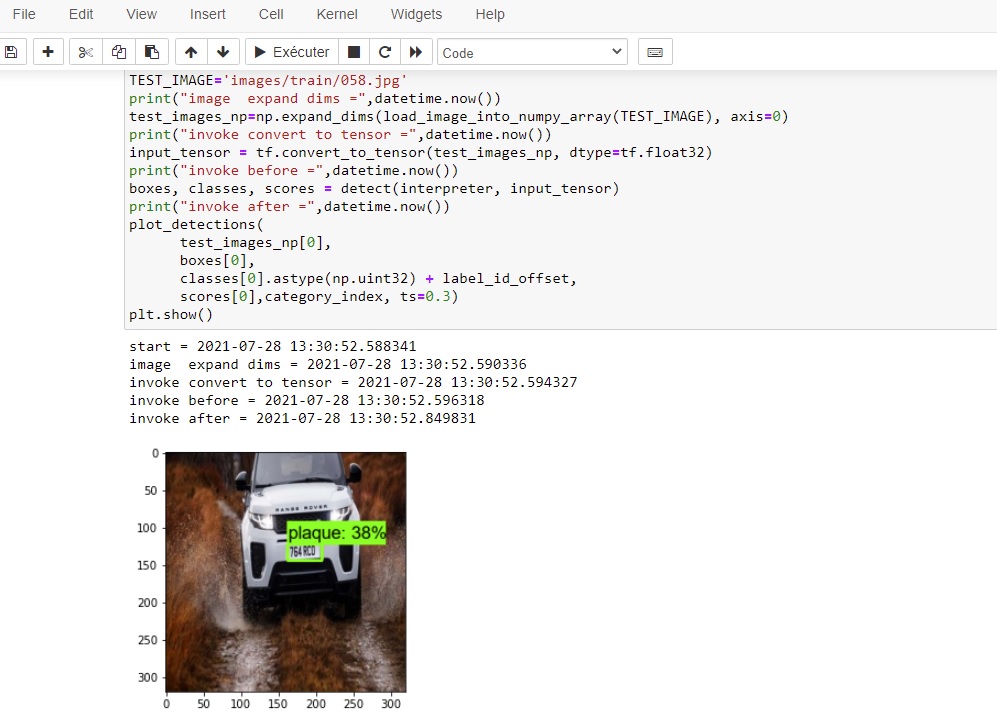
Si tout ce passe bien avec un perte inférieure à 0.2 le model obtenu est fonctionnel. Testé sur Raspberry PI 4 et sur un PC sous windows 10 le temps d'inférence par frame est de l'ordre de 200 ms (dans mon exemple entrainé avec seuelement 200 images pour 4 classes, le taux d'occuracy est de l'ordre de 50à 60 % pour le model tflie)
Ci-dessous les détails des temps de traitement sur une image de test